Showing posts with label painting. Show all posts

Saturday, November 30, 2013

Pre Hong Kong Plein Air

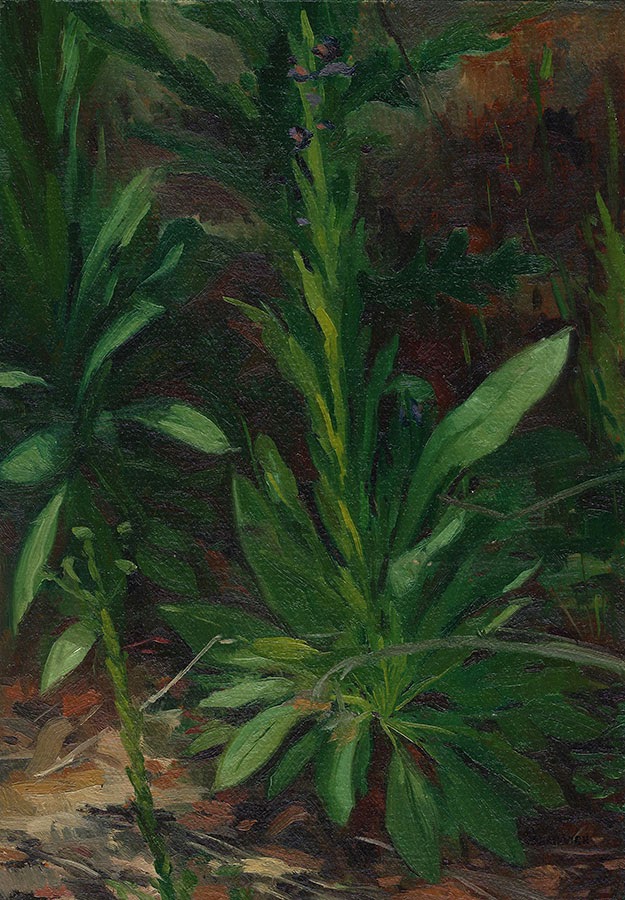
Here are a few paintings I did before moving to Hong Kong. These have been sitting on my hard drive for a while and I had forgotten that I had them. They are all oil on amber shellacked paper.

The first was done with Richard Hull's landscape painting group shortly before leaving Utah for Hong Kong.


This was done on the side of the road on the way back from viewing the annular eclipse, which...started in Hong Kong. I went down to southern Utah on a painting trip to view it.


This was part of that same trip. The location is called Grosvenor's Arch. It's a little out of the way, but worth the trip.


People in my plein air group like to make fun of me for painting the weeds (see the one at top for more weeds). There are at least a couple different approaches to going landscape painting on location outside. One is to paint and simplify the big scene. This is very valuable as a tool for developing a compositional, lighting and general atmospheric sense of the big landscape. It allows you to develop space and abstract your visual perception. If you haven't done it before, the beginning landscape painter is often overwhelmed by the wealth of detail available and quite literally indescribable. Another is to paint the smaller intimate details, like weeds or branches or other small and medium flora. This is, to paraphrase Durand, to familiarize yourself with the alphabet of the landscape. These are the bits and pieces that make up the larger more dynamic space. It's something that I've grown fond of after participating in two Hudson River Fellowships.


Wednesday, November 27, 2013

Oil Painting Exploration PNTG203 demos

Here are some demos of the different processes my students explore in PNTG 203 at SCAD in Hong Kong during the Spring of the last school year and the Fall of this school year.  Each are slightly smaller than A4. I have my students work at this relatively small scale so that the images are big enough to be completed in the allotted time. I walk them through the basic processes of oil painting beginning with the imprimatura (wipe out), grisaille, warm/cool and dead layer, simplified neapolitan method, and venetian method. Each section lasts for two weeks of classes, which gives you the full ten weeks of the quarter.

These first three are imprimaturas (wipe outs) using one color on a white surface that is then wiped back to reveal the white of the canvas to varying degrees to get at the effect of light and form on the surfaces.  These were done as alla prima demos in class ranging from 1.5 to 2.5 hours in class.


Cast paintings are better when dressed up.

This is a grisaille done using cold black and titanium white. In this demo I intentionally left some areas less finished than other areas to serve as a reference for my students. My demos get pinned up in the classroom. I start with a fairly rough imprimatura, which you can see in the background, bowl and mushroom. I lay in flat colors in the light first, as you can see in the light part of the mushroom and the table top And then I modulate those tones from that middle average to lighter and darker parts of the light side. Depending on the final effect I'm seeking I may leave the shadow areas largely untouched by white, as I did in this demonstration.


The next section is the warm/cool and dead layer. This is a sample of one of the dead layer exercises we do. I have them grid their A4 sheets into 1 cm squares on a pre-toned dark brown surface. Using Venetian Red, Yellow Ochre, Blue Black and Titanium White they must choose the single color that most belongs in each block. That may be either an average of the tones of that region or the dominant color. The choice affects the final effect of the portrait. Each square must be filled in completely with no ground showing through and each square must be assessed and filled individually. When painting from the live model, I arrange for the model to remain with the class beyond the end of the class period so that they may keep working after I have left.


The final two exercises involve simplified versions of the Neapolitan Method (Carravaggio) and the Venetian Method (Titian). The Venetian method is shown below. The white surface is toned before class in a soft layer of Venetian Red or any other warm earth red. For this class I go into the local meat markets and procure a pig head, which is frozen between class sessions. I also leave the pig head out for after class ends for students who wish to continue to develop it. The surface is oiled out with linseed oil before painting and liquin is used to accelerate the drying time.

A brown tonal imprimatura is laid over the pre-toned surface for the drawing during the first session.  During the second session a layer of white is used to describe the forms primarily in the light side and some thinner layers in the dark side. No other colors are used, simply white that is thinned out to describe the form. Students are encouraged to develop the texture of the surface based on the tactile qualities native to the object and to consider the use of the cooler temperatures that emerge in the interaction with the lower layers as the paint is thinned at the cooler turnings of the form. The third session is a glazing session, where transparent colors are placed broadly to describe the general colors of the area. This works well with the white and adds a more luminous general effect. Warm tones are especially emphasized in the crevasses to heighten the effect of subsurface scattering. During the fourth and final session, also the last day of classes when students are already mentally gone, a finishing layer is applied using a couch (a thin soupy tone that is placed over everything as a unifying layer) and then the opacity of the lights is reestablished. I brought in some of my flake white stash to show the special subtle working properties it has. Due to time constraints, I focused primarily on the pig head during each evening of class. Edges are emphasized and the shadows are generally left alone as the forms in the light side are developed tonally and topographically.


Sunday, April 28, 2013

Almost done

This picture I started last year is nearly complete. Just some minor touch ups and a certain effect I'm still working on.

Blurry iPhone shot


Saturday, April 27, 2013

Gallery tour with Jin Meyerson

On Friday Jin Meyerson was kind enough to take a mix of SCAD HK students on a small gallery tour. We visited White Cube, Gallerie Perrotin and Cat Street Gallery.

At White Cube there was an exhibit of Damien Hirst collages. One type was made up entirely of insect collections and the other was made up of razor blades and scalpels. A sort of play with beauty and death.
At Galleries Perrotin we saw two shows. One is a painter, the other a sculptor.
Professor Johnson speaking with students.
Ronald Ventura's show "Voids and Cages" was on display. The images are full of crafted details of death and pop culture (look for the Angry Birds).
Professor Johnson speaking with students.
Wim Delvoye also had a show of detailed sculptures on display, including this Gothic semi trailer.
At Cat Street Gallery there is a show of heavily textured landscapes by Melanie Comber.

Jin finishing up the evening tour.


Friday, April 19, 2013

Recent Studies

Moving to Hong Kong, getting oriented, and setting up here has taken up a lot of my time over the last 6 months or so. Here are some small studies I've done recently. More to follow. I painted these from my imagination and are on shellacked paper with sennelier walnut ink imprimaturas and oil painting on top.

See my instagram account there on the side for shots of other works in progress and sights seen.


Sunday, November 13, 2011

Hudson River Fellowship 2011 Part 6

The last post.

Just a couple of final pictures. These were some multi-session forest interiors completed during the third and fourth weeks of the Hudson River Fellowship. One at Platte Clove and the other at Elka Park.

Cliff at Platte Clove

Elka Park Interior

Tuesday, November 1, 2011

Hudson River Fellowship 2011 Part 5

Sunsets.

Most every evening, when there were clouds on the horizon, a group of us would get together on an empty lot at the top of a hill. We sarcastically refer to it as Mosquito Plateau.  After a good shower of bug repellent we set up to paint the sunset. Some would just do one sunset and others would paint several. I attempted to put myself into the latter category.

There are a couple of tricks to painting sunsets en plein air. The first is to premix your colors. I used mostly a set of very chromatic colors. Indian Yellow, Alizarin Crimson or Perelyne Red, Prussian Blue, and occasionally a green. Occasionally, I found it helpful to mix some Indian Yellow into my Cadmium Orange ahead of time too, it seems to intensify the color without changing it too much. The second trick is to not premix them too lightly. Part of painting the sunset is maintaining the chromatic intensity of the light reflecting back at you.  Which means the third trick is to paint at a somewhat lower key than you think is necessary. Because you are looking directly at the sun while you're painting, your eyes may think that you are painting more darkly and intensely than you really are. For me, the fourth is to work very small. I divided my paper up into 3-4 sections using tape well ahead of time and confine myself to working at that very small scale. I also liked to work on an untoned white surface, so that I could utilize some of the glazing possibilities that I have with a white surface. The fifth might be preparation. An early arrival, about 20 minutes ahead of the painting start time is helpful, as is premixing. I also liked to check the weather reports earlier in the day to see if there would be any clouds in the area.

These were ideas that I found useful. Others preferred to work on a single panel the whole time, work in a different color palette or a different size. James Gurney was also kind enough to feature my sunsets and my weary face on his blog when he visited the fellowship.

Here are a number of them that I did during the fellowship. A number of these are sequentially from the same night. I will be making these and others available on Etsy soon.

They are up on Etsy.com as of the 21st of November.

Sequence 1


Sequence 2


Sequence 3


The Moon.

Or if the sunset isn't very interesting, sometimes you can turn and paint the moon!

Sunday, October 30, 2011

Work in Progress: porcupine and...pt. 1

I've always heard the rumors, but I never investigated until recently. BYU's Monte L. Bean Natural History museum does indeed lend out a selection of their collection. This is a close up of the porcupine I'm painting, that I checked out from there earlier this week. I only have two weeks with the animals I borrowed. So I will be curious to see how this painting works out.


Saturday, October 29, 2011

Springville Museum of Art Spiritual and Religious Show

I sent my painting "For Our God Is A Consuming Fire, Hebrews 12:29" to the Spingville Museum of Art for their 26th Annual Spiritual And Religious Art Show. The preview was last night and I was given an Award of Merit. My piece was particularly mentioned in the pamphlet for the show.

The show is up until the 27th of December. There a large number of notable pieces that will make your visit worthwhile and uplifting.
 

Nov. 6 Update: The Deseret News reviewed the show in their Sunday Edition.  Click here to read. I'm mentioned at the end of the first page.

The San Rafael Swell and Etsy

The San Rafael Swell of Utah is a large desert region south of Price, east of Castle Dale, and north of Moab. It is a sandy open area, spotted with wind-carved canyons. There are no amenities there. And that remoteness is part of what it makes the region so attractive. I went down there last weekend to do some studies and these were some of the results.

I have also decided to make these small works on paper available through Etsy. Payment is accepted via PayPal. Though these plein air works are different than my regular studio practice, they are an important part of the work I do. Working from life and on location feeds my imagination. The paper is sealed with shellac, which is a delightful surface to work on. When the paintings are purchased, they will be appended to foam core board to give them a firm foundation. Other works will be gradually listed as time and interest allow.